With a brush tool, you can create masks for disjoint objects, that have multiple parts, such as a house hiding behind trees, a car behind a pedestrian, or a pillar behind a traffic sign. The brush tool has several modes, for example: erase pixels, change brush shapes, and polygon-to-mask mode.
Use brush tool for Semantic (Panoptic) and Instance Image Segmentation tasks.
For more information about segmentation masks in AnnotatePlus, see Creating masks.
See:
- Brush tool menu
- Annotation with brush
- Annotation with polygon-to-mask
- Remove underlying pixels
- AI Tools
- Import and export
Brush tool menu
The brush tool menu appears on the top of the screen after you click Shape:

It has the following elements:
| Element | Description |
|---|---|
| Save mask saves the created mask. The saved mask will appear on the object sidebar | |
 | Save mask and continue adds a new mask to the object sidebar and allows you to draw a new one immediately. |
| Brush adds new mask/ new regions to the previously added mask). | |
 | Eraser removes part of the mask. |
 | Polygon selection tool. Selection will become a mask. |
 | Remove polygon selection subtracts part of the polygon selection. |
 | Brush size in pixels. <br />Note: Visible only when Brush or Eraser are selected. |
 | Brush shape with two options: circle and square. <br />Note: Visible only when Brush or Eraser are selected. |
| Remove underlying pixels. When you are drawing or editing a mask with this tool, <br />pixels on other masks that are located at the same positions as the pixels of the <br />current mask are deleted. | |
 | Hide mask. When drawing or editing a mask, you can enable this feature to temporarily hide the mask, allowing you to see the objects underneath more clearly. |
 | Label that will be assigned to the newly created mask |
 | Move. Click and hold to move the menu bar to the other place on the screen |
Annotation with brush
To annotate with brush, do the following:
-
From the controls sidebar, select Brush
 .
. -
In the Draw new mask menu, select label for your mask, and click Shape.
The Brush tool will be selected by default.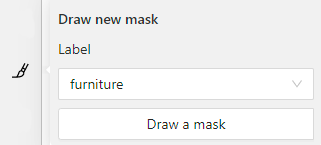
-
With the brush, draw a mask on the object you want to label.
To erase selection, use Eraser
-
After you applied the mask, on the top menu bar click Save mask

to finish the process (or N on the keyboard). -
Added object will appear on the objects sidebar.
To add the next object, repeat steps 1 to 5. All added objects will be visible on the image and the objects sidebar.
To save the job with all added objects, on the top menu, click Save  .
.
Annotation with polygon-to-mask
To annotate with polygon-to-mask, do the following:
-
From the controls sidebar, select Brush
. -
In the Draw new mask menu, select label for your mask, and click Shape.
-
In the brush tool menu, select Polygon
. -
With the Polygon
tool, draw a mask for the object you want to label.
To correct selection, use Remove polygon selection. -
Use Save mask
(or N on the keyboard)
to switch between add/remove polygon tools:
-
After you added the polygon selection, on the top menu bar click Save mask
to finish the process (or N on the keyboard). -
Click Save mask
again (or N on the keyboard).
The added object will appear on the objects sidebar.
To add the next object, repeat steps 1 to 5.
All added objects will be visible on the image and the objects sidebar.
To save the job with all added objects, on the top menu, click Save .
Remove underlying pixels
Use Remove underlying pixels tool when you want to add a mask and simultaneously delete the pixels of
other masks that are located at the same positions. It is a highly useful feature to avoid meticulous drawing edges twice between two different objects.
![]()
AI Tools
You can convert AI tool masks to polygons. To do this, use the following AI tool menu:
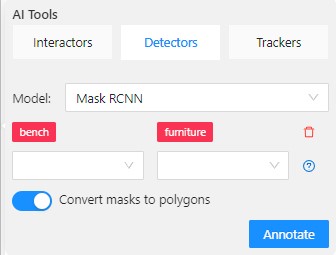
- Go to the Detectors tab.
- Switch toggle Masks to polygons to the right.
- Add source and destination labels from the drop-down lists.
- Click Annotate.
Import and export
For export, see Export dataset
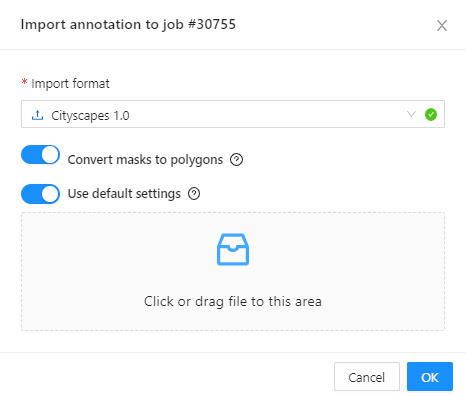
Import follows the general import dataset procedure, with the additional option of converting masks to polygons.
Note: This option is available for formats that work with masks only.
To use it, when uploading the dataset, switch the Convert masks to polygon toggle to the right: